CapCut truly is an amazing app that includes various creative tools to make your video more capitative. The ability to reverse your video is also one such great tool included in CapCut. Reversing the video will surely add a creative and magical touch to your videos.

If you want to add some fun, magic tricks, and enhanced storytelling elements to your videos then reversing the video is a nice approach. This process of video reversing is easier and quicker than ever before thanks to the video editing app CapCut. This article focuses on the way of reversing your video using this nice app CapCut. Let’s get started.
Finding the reverse feature in CapCut
You can find the reverse tool inside the app very easily. Open the app and add your video to the timeline. Then below the editing timeline you can see a horizontal tool panel. There as the first option, you can see the ‘Edit’ tab. Tap on it. It will open another set of different tools. Scroll and find the ‘Reverse’ tool. You surely will find accessing and applying the reverse effect is much more convenient in CapCut.
Reversing your video
This section includes detailed and easy-to-follow guidance to apply the reverse effect to your videos. You have to start the process by selecting and adding your video to the editing timeline.
Selecting the video clip
- Open the CapCut app on your Android.
- Once you open the app you can see a blue color box with the ‘New project’ tab.
- Tap on this. You can see all your videos and photos stored on your device. As well you can have access to the huge video library of the app too.
- Select the video clip you want to add the reverse effect. After selecting the clip if you want to do some basic trimming then you can do so.
- After that, you can add the video to the editing timeline by tapping on the ‘Add’ button at the bottom right-hand corner of the interface.
Finding the reverse option
- Once you add the video to the editing timeline, you can see a horizontal toolbar with different options at the bottom of the interface below the editing timeline.
- Then access the ‘Edit’ tool at the start of the toolbar.
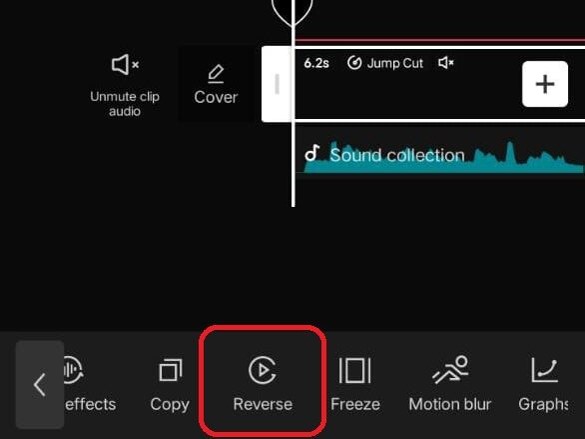
- Next scroll and locate the ‘Reverse’ tool from the opening tools set.
Simple Click for Reverse
- After locating the ‘Reverse’ feature tap once on the button. The app will start the reversing process as soon as you click on this button.
- Then you can see the percentage completed on the reversing on the popping up box.
- If you tap this ‘Reverse’ button again the applied reverse effect will cancel. If you want to reapply the effect tap again on the button.
Reversing your video using CapCut is super easy. A single click on the “Reverse” option will initiate the process of reversing your video clip and this process will be completed within a few seconds.
Previewing and Adjustments
Previewing the Reversed Clip
After applying the reverse effect to your video clip, you can preview the video before exporting it. simply tap on the ‘Play’ icon at the center of the editing timeline. You can see the video preview after applying the reverse effect. This previewing step helps you to get a clear idea about how the applied effect changed your video and if there are any changes you need to make before exporting you can go for them.
Re-reversing
If you want to cancel the applied reverse effect then you can re-tap the reverse button. This tapping will cancel the applied effect. Reapplying can be done by tapping the button again.
Exporting Your Reversed Masterpiece
Exporting the video with reverse effects is very simple here. After previewing your video you can adjust the video resolution, frame rate and the code rate by tapping on the resolution icon near the exporting icon.
After you set up the desired parameters of the exporting video tap on the upward arrow at the top right-hand corner of the interface. This is the export icon. Once you tap on the export icon your project will get saved on your device and under the ‘Projects’ section of the app.
If you want to share your creation with your friends then, you can share it directly here. share your video on TikTok, Instagram, Stories, WhatsApp, Facebook, etc, like platforms very easily.
Creative Ideas for Reverse Videos in CapCut
Reversing the video will add a touch of creativity to your videos making them magical and funny. Here are some of the creative ideas to use this nice reverse effect.
Funny Moments
Many people like to add this reverse effect to their videos to make them more fun. Imagine what it would look like if you see people dancing on the reverse playback, or when your pet defies gravity, or when your child rolls up on a slide. The reverse effect surely will help you add more fun to your clips when needed.
Time-Lapse Illusions
If you want to create a cool rewind effect for showcasing processes or transformations then reverse effect is the ideal tool to use. Imagine how nice it would be if you could showcase flower blooms, or build something creative. You can capture your moments in time-lapse videos and then reverse. This process surely will create a captivating rewind effect.
Enhanced Storytelling
Make your storytelling idea more captivating and engaging with this cool reverse effect. Using reversed video segments in your storytelling will add intrigue or a unique flow to your storytelling.
Conclusion: Unleash Your Inner Time Traveler
If you want to unleash your inner time traveler then the best and the simplest trick you can use is to reverse your Video. Reversing the video is a simple task with CapCut’s ‘Reverse’ tool.
The reverse tool of the app is easily accessible. You can scroll the bottom toolbar of the editing interface of the CapCut for the ‘Reverse’ tool. One-click on this tool will add the reverse effect to your video. Re-tapping allows you to cancel the applied effect. So, make sure to use this nice feature of CapCut whenever possible to make your videos more creative and captivating.